Announcing Supabase Auth for your API Developer Portal! - Supaweek Day 5
Learn how to use Supabase's easy Auth in your API Developer Portal
Today we're announcing a new feature for your API Developer Portal: Supabase Auth integration!
Whether you're following our week-long tutorial on building an AI-based API with Supabase and Zuplo, or you're exposing an API with Zuplo and need a Developer Portal where your API users can sign-in to manage their access to your API, you can now use Supabase Auth to manage your API's users and their access to your API.
What is Supabase Auth?
Supabase Auth is a simple, secure, and open-source authentication service that provides authentication and user management for your applications. It's built on top of PostgreSQL and works seamlessly with Supabase's database and storage services.
Using an external auth page for your Dev Portal
To use Supabase Auth in your Zuplo Developer Portal, you'll need to have an external auth page that Zuplo connects to. This page will be responsible for handling the authentication flow and redirecting the user back to your Developer Portal.
Luckily, our SupaAPI Site deployed as part of the Supaweek Day 4 tutorial already has an auth page using Supabase Auth, so we can leverage that to connect your Dev Portal to it. This is a very common use case where you want a single auth page for all your apps and APIs, and Supabase Auth is a great solution for that.
Setting up Supabase Auth for your API
To set up Supabase Auth for your API, you'll need to do the following steps. Bare in mind that you'll need to have an API deployed with Zuplo and a Developer Portal for it, so if you don't have that yet, you should follow the Supaweek tutorial starting from Day 1 to create one.
The instructions below assume that you have the Web-app we configured in Day 4, which is a NextJS app that uses Supabase Auth and has a login and logout page configured already to work with Zuplo's Developer Portal. If you're coming fresh though, you can follow the instructions in the documentation to set up your own auth page.
A video walkthrough of this tutorial is available here:
Step 1 - Configure your Dev Portal to use Supabase Auth
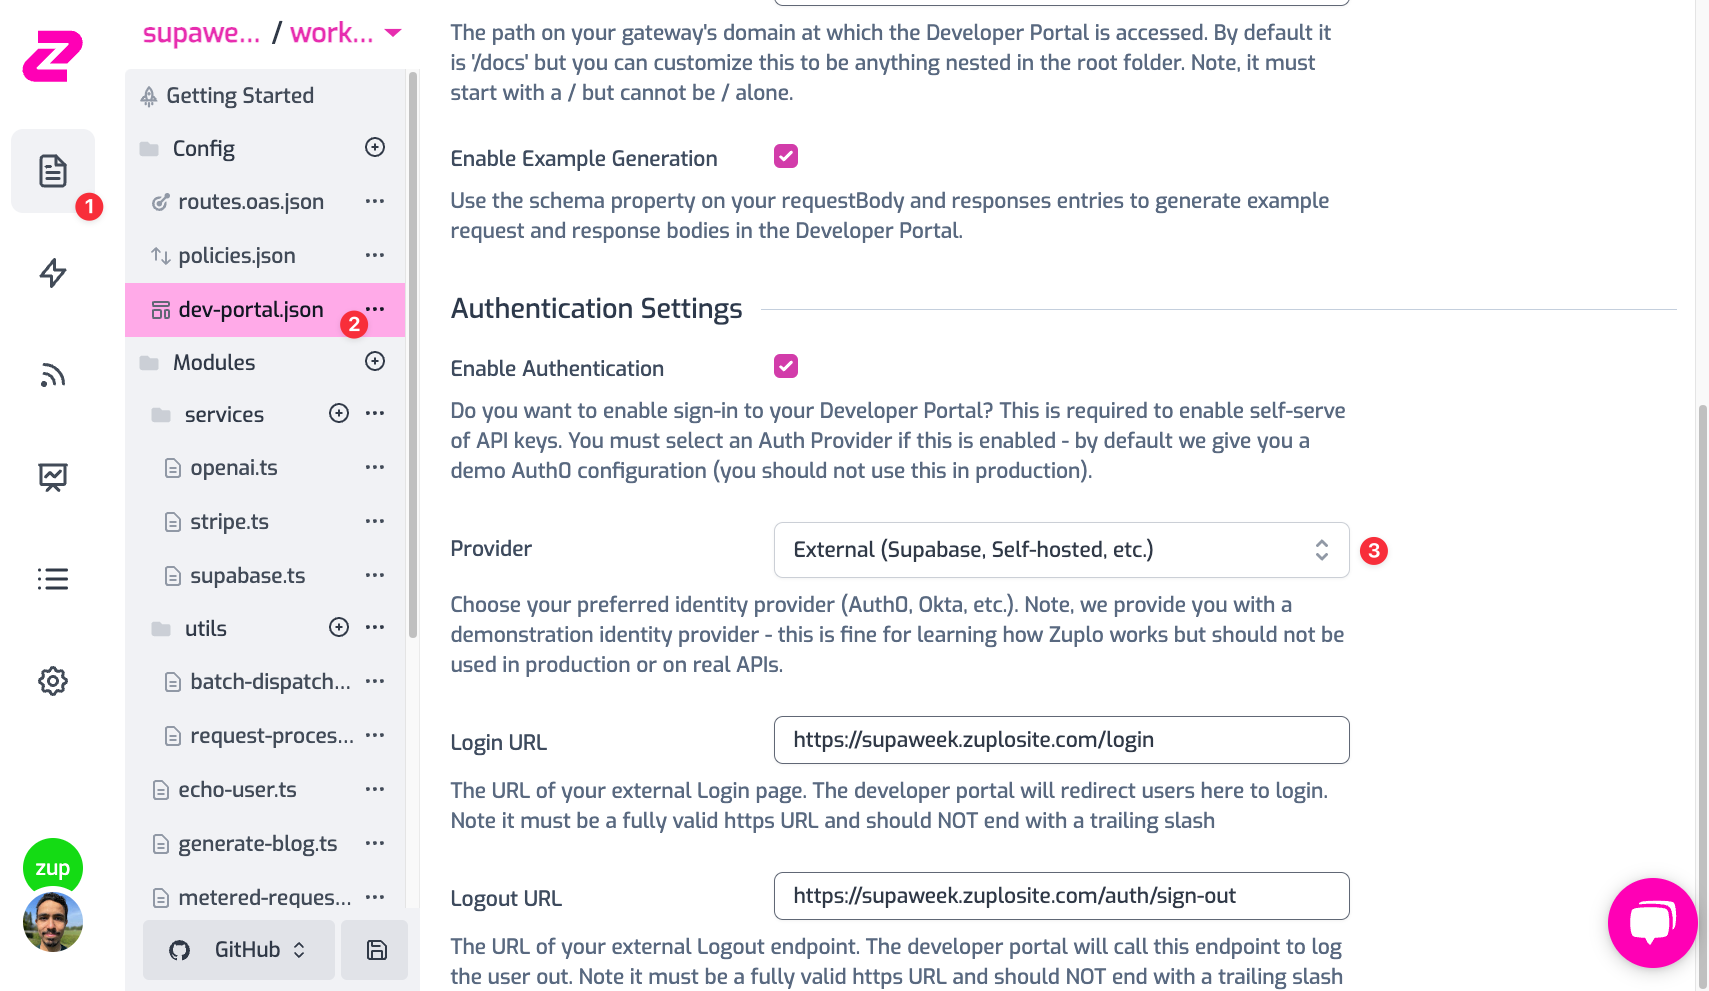
In Zuplo, go to Files > dev-portal.json and change the Authentication Settings section to use an external provider. You will need to set the Login URL and Logout URL to the URLs of your deployed SupaAPI Site. The SupaAPI site login URL is configured to be at /login, and the log-out is set to /auth/sign-out.

Step 2 - Open the Dev Portal and try it out!
Now that you've configured your Dev Portal to use Supabase Auth, you can open it (sign out if you're already signed in) and try to log in as a user. You'll see that you're redirected to the SupaAPI Site's login page, and once you log in, you'll be redirected back to the Dev Portal.
How does it work?
When you click on the Sign-in button in the Dev Portal, Zuplo will redirect you to the login URL you've configured in the previous step. This URL is the login page of your SupaAPI Site, which is already configured to use Supabase Auth by receiving the create-session-url query parameter from Zuplo.
Once you log in, the SupaAPI Site will create a session for you in the Dev Portal, adding the cookie, and will redirect you back to it. You can see how this is implemented in the SupaAPI Site's sign-in route.
Building, shipping and monetizing APIs
It's been a great week of learning how to build, ship and monetize APIs with Supabase and Zuplo. We've covered a lot of ground, and we hope you've enjoyed it!
As always, we're here to help you build your next API, so if you have any questions, feel free to reach out to us on our Discord server, or dropping us a tweet at https://twitter.com/zuplo.
